
 clusters with NSX ALB (Avi)")
Overview
NSX ALB (previously known as Avi) offers rich capabilities for L4-L7 load balancing across different clouds and for different workloads. NSX ALB can be configured to L4-L7 load balance across containers workloads by means of deploying an ingress controller which is known as AKO (Avi Kubernetes Operator) and leverage the standard Ingress API in Tanzu or K8s clusters.
The AKO deployment consists of the following components:
- The NSX ALB Controller
- The Service Engines (SE) –> Actual Load Balancers
- The Avi Kubernetes Operator (AKO) –> Ingress Controller

Why use NSX ALB (Avi) with your Tanzu clusters?
NSX ALB can be integrated to your Tanzu deployments in two ways, either by installing only AKO on every Tanzu cluster you have, which then can be used as Ingress for your HTTP/HTTPS backend services (as described in my previous blog post HERE) or you can define NSX ALB as the endpoint HA provider for both your Tanzu control plane nodes and load balancer provider for your workload clusters. The later gives you more automated to use NSX ALB as integrated load balancer for all your Tanzu clusters, since you do not need to deploy and configure NSX ALB AKO every time you roll out a new Tanzu workload cluster.To use the later method, we need to define NSX ALB parameters while setting up our Tanzu Kubernetes management cluster.
In this two part blog post, in part one I am going to discuss how Tanzu Kubernetes Grid management clusters (TKGm i.e. not using vSphere with Tanzu) can be configured to make use of integration with NSX ALB.
Lab Inventory
For software versions I used the following:
- VMware ESXi 7.0U3f
- vCenter server version 7.0U3f
- TrueNAS 12.0-U7 used to provision NFS data stores to ESXi hosts.
- VyOS 1.4 used as lab backbone router and DHCP server.
- Ubuntu 18.04 LTS as bootstrap machine.
- Ubuntu 20.04.2 LTS as DNS and internet gateway.
- Windows Server 2012 R2 Datacenter as management host for UI access.
- Tanzu Kubernetes Grid 1.5.4
- NSX ALB controller 22.1.1
For virtual hosts and appliances sizing I used the following specs:
- 3 x ESXi hosts each with 8 vCPUs, 2 x NICs and 96 GB RAM.
- vCenter server appliance with 2 vCPU and 24 GB RAM.
Prerequisites
We need to ensure that we have the following components installed and running before we proceed:
- A linux machine (bootstrap) having compatible kubectl and Tanzu cli installed, in addition to docker installed (Install the Tanzu CLI and Other Tools).
- Compatible NSX ALB controller deployed and connected to a vCenter cloud instance (Install and Configure the NSX Advanced Load Balancer)
- Custom SSL Access certificate configured on NSX ALB (keep reading to learn how).
- IPAM profile configured on the NSX ALB.
- IP Pool configured on NSX ALB for vsphere network on which Tanzu control-plane and worker workloads VIPs will be connected.
NSX ALB configuration
In the following steps, I will be preparing my NSX ALB deployment to be used by my Tanzu Kubernetes Grid management cluster.
Step 1: Create a dedicated cloud instance and connect to vcenter
For this lab, I created a dedicated cloud called chocomel-cloud with WRITE_ACCESS permission to my vcenter instance


The avi-mgmt-chocomel is a vsphere network to which ALB controller management interfaces is connected and I am using it as well for SE management IPs connectivity. For more details check my previous blog post HERE. This is the vcenter port group on which the SEs management interfaces will be attached to. We will also need to define either a DHCP pool in this subnet or static IP pool (as in my case) from which ALB can assign management IPs to SEs.
Note: We will be creating the IPAM profile in the next step and add it to the chocomel-cloud parameters above. IPAM is a must so that ALB can assign IPs to the VIPs created for both control plane endpoint and workloads. DNS profile is however will be ignored in this blog post as I will manually be adding DNS entries of ingress FQDNs to my DNS.
Step 2: Create IPAM profile
In the NSX ALB GUI, navigate to Templates and under Profiles click on IPAM/DNS Profiles and then click on create and create an IPAM with similar configuration to the below:

The usable network is pulled from the vcenter to which we are connected to in step 1, this is a port group which ALB will use to assign IP addresses to VIPs, this is very important.
Once you create your IPAM profile, go back to step 1 and add it to the IPAM profile section highlighted.
Step 3: Create an IP pool for VIP assignment
This step is a completion for step 2, because we need to configure an IP range from which the IPAM profile will use. To do this, navigate to Infrastructure > expand Cloud Resources > Networks and then select the network which you choose as usable network under your IPAM (in my case it is called TKG).
As you can see I have already defined an IP Pool for this network, if you do not have one configured then click on the pen icon to the right of the network and add an IP pool similar to the below:

Step 4: Generating NSX ALB Access SSL Certificate
During the process of creating TKG management cluster, a connection to NSX ALB is needed, this is based on SSL and we need to create an SSL access certificate to be used by the TKG deployment to authenticate to our NSX ALB.
Login to your ALB UI, navigate to Templates > Security > SSL/TLS Certificates then CREATE and choose Controller Certificate from the drop down menu


Important: ensure that under the SAN to add 2 entries, one for the FQDN of your ALB and the other for its IP address.
Once the certificate is generated (after you press save) you need to add the newly generated certificate as SSL access certificate for the ALB controller. Navigate to Administration > Settings > Access Settings and click on the right hand side icon of the pen to edit the default access configuration. Under SSL/TLS Certificate remove all the default certificates and add your newly created SSL certificate:

You then need to logout of your ALB UI, clear your browser cache and re-login so that the new certificate is read.
Note: for production you will need to generate a CA signed SSL certificate and not a self-signed certificate which we generated above.
Installing and configuring TKG
For this step you can either use a Tanzu management cluster creation file (shown below) or use the GUI interface that Tanzu CLI can launch. If you decide to use the UI then skip the code below, if you however want to start the management cluster creation using the configuration file below then copy and paste the contents below (after adding your own specific values) save the file as YAML and then from the bootstraap machine run the command:
tanzu mc create <cluster-config-yaml-file> -v 6
Below is a sample cluster YAML configuration file:
AVI_CA_DATA_B64: <paste here your base64 encoded AVI SSL certificate>
AVI_CLOUD_NAME: chocomel-cloud
AVI_CONTROL_PLANE_HA_PROVIDER: "true"
AVI_CONTROLLER: alb-controller.corp.local
AVI_DATA_NETWORK: TKG
AVI_DATA_NETWORK_CIDR: 172.10.82.0/24
AVI_ENABLE: "true"
AVI_LABELS: ""
AVI_MANAGEMENT_CLUSTER_VIP_NETWORK_CIDR: 172.10.82.0/24
AVI_MANAGEMENT_CLUSTER_VIP_NETWORK_NAME: TKG
AVI_PASSWORD: <encoded:Vk13YXJlMSFWTXdhcmUxIQ==>
AVI_SERVICE_ENGINE_GROUP: Default-Group
AVI_USERNAME: admin
CLUSTER_CIDR: 100.96.0.0/11
CLUSTER_NAME: vexpert-tkg-mgmt
CLUSTER_PLAN: dev
ENABLE_AUDIT_LOGGING: "false"
ENABLE_CEIP_PARTICIPATION: "false"
ENABLE_MHC: "true"
IDENTITY_MANAGEMENT_TYPE: none
INFRASTRUCTURE_PROVIDER: vsphere
LDAP_BIND_DN: ""
LDAP_BIND_PASSWORD: ""
LDAP_GROUP_SEARCH_BASE_DN: ""
LDAP_GROUP_SEARCH_FILTER: ""
LDAP_GROUP_SEARCH_GROUP_ATTRIBUTE: ""
LDAP_GROUP_SEARCH_NAME_ATTRIBUTE: cn
LDAP_GROUP_SEARCH_USER_ATTRIBUTE: DN
LDAP_HOST: ""
LDAP_ROOT_CA_DATA_B64: ""
LDAP_USER_SEARCH_BASE_DN: ""
LDAP_USER_SEARCH_FILTER: ""
LDAP_USER_SEARCH_NAME_ATTRIBUTE: ""
LDAP_USER_SEARCH_USERNAME: userPrincipalName
OIDC_IDENTITY_PROVIDER_CLIENT_ID: ""
OIDC_IDENTITY_PROVIDER_CLIENT_SECRET: ""
OIDC_IDENTITY_PROVIDER_GROUPS_CLAIM: ""
OIDC_IDENTITY_PROVIDER_ISSUER_URL: ""
OIDC_IDENTITY_PROVIDER_NAME: ""
OIDC_IDENTITY_PROVIDER_SCOPES: ""
OIDC_IDENTITY_PROVIDER_USERNAME_CLAIM: ""
OS_ARCH: amd64
OS_NAME: photon
OS_VERSION: "3"
SERVICE_CIDR: 100.64.0.0/13
TKG_HTTP_PROXY_ENABLED: "false"
TKG_IP_FAMILY: ipv4
VSPHERE_CONTROL_PLANE_DISK_GIB: "20"
VSPHERE_CONTROL_PLANE_ENDPOINT: ""
VSPHERE_CONTROL_PLANE_MEM_MIB: "4096"
VSPHERE_CONTROL_PLANE_NUM_CPUS: "2"
VSPHERE_DATACENTER: /vExpert-Homelab
VSPHERE_DATASTORE: /vExpert-Homelab/datastore/DS01
VSPHERE_FOLDER: /vExpert-Homelab/vm/TKG
VSPHERE_INSECURE: "true"
VSPHERE_NETWORK: /vExpert-Homelab/network/TKG
VSPHERE_PASSWORD: <encoded:Vk13YXJlMSE=>
VSPHERE_RESOURCE_POOL: /vExpert-Homelab/host/Chocomel/Resources/TKG
VSPHERE_SERVER: vc-l-01a.corp.local
VSPHERE_SSH_AUTHORIZED_KEY: none
VSPHERE_TLS_THUMBPRINT: ""
VSPHERE_USERNAME: administrator@vsphere.local
VSPHERE_WORKER_DISK_GIB: "20"
VSPHERE_WORKER_MEM_MIB: "4096"
VSPHERE_WORKER_NUM_CPUS: "2"
If you decide to use the installer UI, then login to your bootstrap machine and run the following command:
tanzu mc create -u -b <your bootstrap-machine-interface>:8080

Now using any web browser open the above URL, you should see the Tanzu page:

Click on Deploy, you then need to provide your vcenter login credentials and then click on connect.

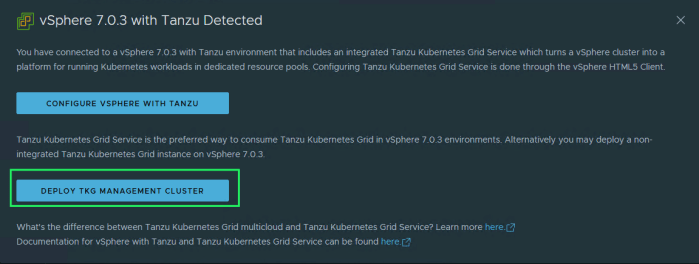
The installation wizard will detect that you are running vcenter 7.0 which supports running TKG clusters on vSphere supervisor cluster (i.e. vsphere with Tanzu) and will give you the option to choose either to configure vSphere with Tanzu or deploy independent TKG management cluster, choose the second one.
You then choose the size of your control plane and worker node, in addition to choosing NSX ALB as your endpoint provider. The endpoint IP address is optional in case of the NSX ALB since in my ALB setup I configured the TKG port group with a static IP pool (172.10.82.0/24) from which NSX ALB will assign VIP IPs for control plane endpoint and cluster workload VIPs.

Press Next, in the following window you have to fill in your NSX ALB parameters, for the certificate you need to copy and paste the SSL CA certificate contents we created in the above section, the installation wizard will use it to connect to NSX ALB via https to create SEs, VIPs and virtual services related to our Tanzu deployment.
In the same window and once the connection to NSX ALB is successful, you will need to choose which cloud instance, SE group, port groups and subnets to be used for VIPs placement. In my case, I choose all to be on the same subnet 172.10.82.0/24 which maps to port group TKG.


Skip the metadata section and straight to the resource configuration, this is basically where the management cluster will be creating the Tanzu control plane VMs (I discussed this in details in one of my previous posts HERE).

Next, you need to choose which vsphere port group the control plane and worker nodes will be connected to. This needs to be a DHCP enabled network since the installation process will roll-out nodes (VMs) and use DHCP to assign IPs from that pool. In my lab, this is also the TKG port group I used for NSX ALB VIPs, however the DHCP range I configured on my DHCP server is different from the IP pool I defined for NSX ALB VIPs, this is to avoid any IP address conflict.
Note, from UI you cannot change the default CNI provider and you will have to stick to Antrea, if you want to use Calico then you need to use the configuration file deployment method and specify Calico as your CNI.

I do not use any identity provider in my home lab so I disabled it and skipped to step 8 where you select a compatible VM template to be used as control plane and worker nodes image. Also in my previous blog post HERE I detailed how you can create and upload a valid image to vcenter.

Next choose to either subscribe to CEIP or not and then start the deployment process. It took about 90 minutes to complete, but if all your bits and pieces are correct then you should see the end result as below:

Verifying TKG management cluster and NSX ALB deployment
From your bootstrap machine, you can verify the status of your management cluster after using the command:
tanzu mc get

To verify the status of the deployed system namespaces and pods, use the following commands sequence:
tanzu login (then login to your management cluster)kubectl get nskubectl get pods -n avi-systemkubectl get pods -n tkg-systemkubectl get nodes -o wide
Your output should be similar to the above to indicate that system important components are up and running.
Last step, login to your ALB UI and go to Applications > Virtual Services you should see a virtual service created by the Tanzu installation process which got an IP address assigned from the IP pool we created earlier while setting up our ALB.
The virtual service is actually the control plane endpoint of our Tanzu management cluster (notice the default Tanzu/Kubernetes port 6443)

to get more details about the SEs and the backend server pool matching the virtual service above, navigate to Dashboard and then in the right pane click on Expand All

The 172.10.82.28 is the actual control plane VM (check the screenshot of output kubectl get nodes -o wide above) and this is currently the VM which is handling any requests hitting the API endpoint of the Tanzu management cluster VIP (172.10.82.150:6443).
Now if you navigate to Infrastructure > Cloud Resources > Service Engine you can see that ALB has deployed two SEs as part of the Tanzu management cluster deployment and those SEs will be load balancing any incoming traffic on the TKG management cluster endpoint VIP.


Final words
TKGm (multi-cloud) in combination with NSX Advanced Load Balancer, offers integrated workload L4 – L7 load balancing leveraging the powerful ALB capabilities and regardless of where your containerised workloads are running. Setting up the whole deployment including advanced load balancer (based on my experience) can be achieved within couple of hours and after that you can roll out workload clusters in matter of minutes.
Hope you have enjoyed and learned something from this blog post!


Pingback: Configuring Antrea NodePortLocal with NSX ALB on TKG - nsxbaas
Hi, great article!
I would have a question though; I see you are using the GUI/Wizard when deploying TKGm, and that a certain point you choose which AVI cloud instance, SE group, port groups and subnets to be used for VIPs placement.
I think this actually configures the values.yaml file that will be then used by the automatically deployed AKO, can you confirm?
Now, if we needed to provide different VIP networks or SE groups for specific guest clusters, this could also be done by manually deploying AKO?
Would the manually deployed AKO override the automatic one or would we need to just skip the deployment of the ALB on the GUI and do it manually for each cluster?
Hi,
Glad that you found the post useful!
yes indeed, the UI just creates the deployment YAML for the management cluster (you actually get the kubectl apply command pointing to that file at the bottom of the wizard). For guest clusters, you just need to reuse the management cluster deployment YAML and adjust the values for your guest cluster(s). If you check category Tanzu on my blog you will get a lot of articles covering TKG and how to create guest clusters (latest post was about Antrea NodePortLocal and TKG).
Pingback: Designing & Deploying Multi-Site TKG Clusters using Federated AMKO and Avi GSLB - nsxbaas
Pingback: Insight into positioning NSX ALB (Avi) with VMware Tanzu Offerings - nsxbaas