

Overview
One of the cool features that was introduced with vSphere 8 is Workload Availability zones, which is basically HA zones for your Tanzu workload clusters hosted on top of vSphere with Tanzu supervisor clusters. Workload availability zones require 3 independent vSphere clusters each with independent networking and storage components, this is needed to provide proper HA functionality across Tanzu workload clusters.
Workload Availability Zones allows Supervisor Clusters and Tanzu Kubernetes Clusters to span across vSphere Clusters for increased availability. vSphere Namespaces span the Workload Availability Zones to support Tanzu Kubernetes Clusters being deployed for increased availability across zones. Three Workload Availability Zones are required for availability. During Workload Management activation, you have a choice to deploy across Workload Availability Zones or deploy to the single cluster option. A Workload Availability Zone has a 1:1 relationship with a vSphere cluster.

Source: VMware Tech Zone
In this blog post, I will explore and test this new feature by enabling zonal supervisor cluster deployment on top of NSX-T networking, more over the requirements for this deployment can be found HERE.
Note: Workload availability zones protects only TKG clusters and do not apply to pods created directly on top of your vSphere supervisor cluster.
Lab Inventory
For software versions I used the following:
-
- VMware ESXi 8.0 IA
- vCenter server version 8.0 IA
- VMware NSX 4.0.1.1
- TrueNAS 12.0-U7 used to provision NFS data stores to ESXi hosts.
- VyOS 1.4 used as lab backbone router and DHCP server.
- Ubuntu 20.04.2 LTS as DNS and internet gateway.
- Windows Server 2012 R2 Datacenter as management host for UI access.
For virtual hosts and appliances sizing I used the following specs:
-
- 7 x ESXi hosts each with 12 vCPUs, 2 x NICs and 128 GB RAM.
- vCenter server appliance with 2 vCPU and 24 GB RAM.
Enabling vSphere Availability Zones
A vSphere Zone provides high-availability against cluster-level failure for Kubernetes workloads deployed on vSphere with Tanzu. You map a vSphere Zone to a vSphere cluster and then use the vSphere Zone to deploy a Supervisor on your vSphere with Tanzu environment. To enable vSphere availability zones, open your vCenter UI client, from right pane click on Configure and from left pane choose vSphere Zones

Click on “ADD NEW VSPHERE ZONE” and start defining your zones as follows:


Click FINISH and then repeat to create the additional 2 cluster zones, finally you should see your 3 zones associated to 3 vSphere clusters

Enable Zonal Workload Management with NSX-T Networking
Step 1: Prepare hosts for NSX and setup backend routing
Before we actually start to enabled workload management (vSphere with Tanzu) on our 3 zones, we need to make sure that our backing NSX environment is configured properly (since I am deploying my supervisor clusters on top of NSX-T networking). Below is a summary of what needs to be done on NSX side:
- Ensure that your hosts across the 3 clusters are connected to the same vCenter DVS (DVS must be version 7 or later) so you need to have a DVS spanning the 3 clusters.
- Ensure that hosts in your 3 clusters are prepared for NSX and connected over an Overlay.
- Ensure that you have your Edge node(s) deployed with Large form factor.
- Ensure that you have a T0 GW configured which distributes routing properly from T1 and connected subnets over BGP to your core network. This is very crucial since your supervisor cluster VMs will need to access DNS and NTP for example during deployment phase and eventually your deployed pods/TKG clusters will need access to your external network (DNS, AD, general internet and os on.).
- You can use static routing but this is totally not recommended as it will be very difficult to keep track of all the subnets that need to be routed from and to NSX.
Detailed steps on how to setup and prepare your NSX routing for vSphere with Tanzu can be referenced in one of my previous blog posts HERE.
Step 2: Create Subscribed Content Library for Tanzu Kubernetes releases
Before we proceed, make sure that you have a content library configured on which WCP service (workload management service) can pull TKG node images from. By default, vSphere comes with this library:
https://wp-content.vmware.com/v2/latest/lib.json

Click NEXT

Click on Yes if you receive a warning about library authenticity, do not apply any security policies on the library and click NEXT to move to Adding Storage

Click on NEXT, then revise the configuration and if all is good press on FINISH
After content library is synced, click on its name and under Templates > OVA & OVA Template you should see a list with the available Tanzu Kubernetes images

Step 3: Create a Zonal Storage Policy
As part of enabling workload management you need to have at least one storage policy defined which supervisor cluster will apply on data stores which will store Tanzu created control and worker nodes.
We need however to define a new storage policy with zonal presence and to create this storage policy (apart from the default encryption policy) from vCenter UI left pane choose Policies and Profiles and then VM storage policies and click on CREATE

Assign a name for your newly create policy

Click on NEXT and then select Enable consumption under Storage Topology


Step 4: Enable zonal workload management
Final step is to enable zonal workload management, navigate to Workload Management and click on GET STARTED

For the networking part, choose NSX

Click on NEXT, you will then need to select the type of deployment which we need to have it as zonal and choose our 3 previously created zones

Choose the storage policy we created earlier and then click on NEXT

Step 4 here is configure management network parameters for supervisor VMs, a network topology for the solution looks like the following:

In my setup, I have my supervisor cluster management network on my VDS port group wcp-mgmt-tonychocloney, this uses vlan 11 which is routed in my core router to all my lab infra services (DNS and NTP) and of course to all ESXi management host network (this is a requirement).

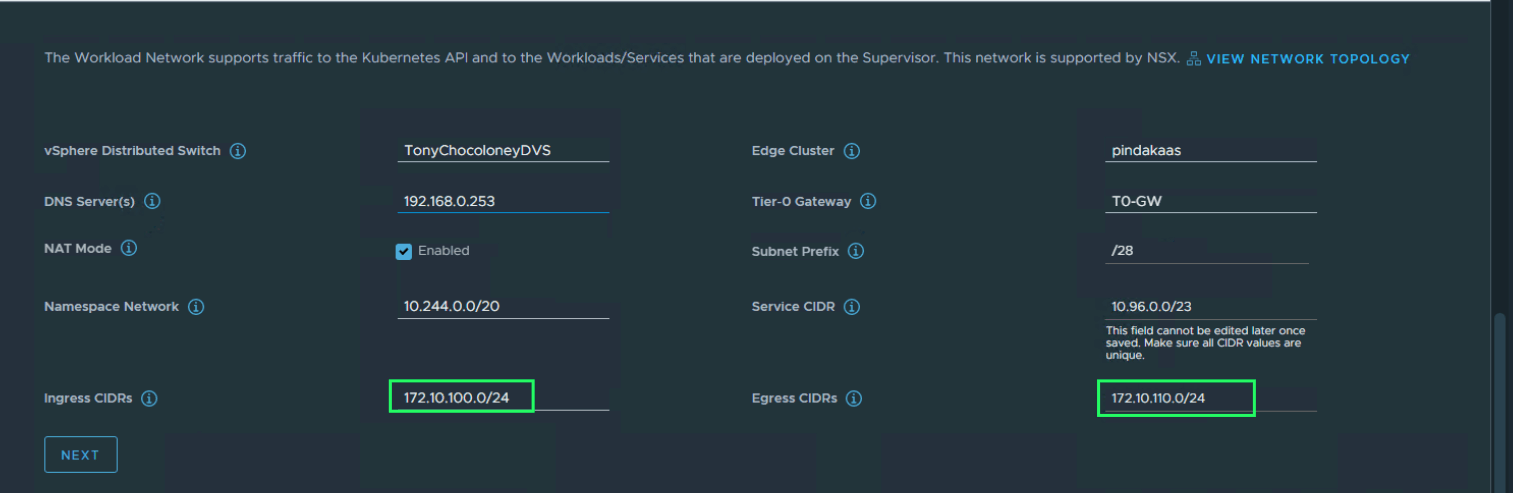
Click on NEXT and fill out workload network parameters matching your setup. Since I am using NSX-T networking I had to fill out my NSX parameters, the highlighted subnets will be configured as VIPs on NSX load balancers and will be advertised via BGP to my core router. Those subnets are used to NAT traffic out of supervisor cluster and to assign IPs for services which will need to be accessed from external services (such as load balancer and ingress services deployed later).
Click NEXT and then choose the content library we subscribed to earlier, this is needed when we start to deploy TKG clusters on top of our supervisor cluster.

Click NEXT, choose the size of your supervisor cluster VMs size and then click on FINISH to start the deployment process

One of the handy additions in vSphere 8 workload enablement workflow is that you can check the status of the deployment at anytime and get more details about the deployment stage

After 15 to 20 minutes, the supervisor cluster should be in running state


Verifying workload management zonal deployment
Now let’s check what are the differences of the multi zonal workload management deployment compared to the standard single cluster. First of all, you notice that the supervisor cluster nodes are deployed across our 3 zones we created earlier

And Hoppa! as you can see the supervisor cluster has been deployed across our 3 cluster zones which is the idea of zonal workload deployment.
In my future blog posts I will be configuring TKG clusters on top of the above zonal supervisor cluster.


Pingback: Deploying TKG workload clusters across vSphere 8 Availability Zones - nsxbaas
Pingback: Deploying TKG 2 workload clusters with vSphere 8 with Tanzu - nsxbaas
I have an issue with the inventory tree view:
I don‘t see the supervisor control plane nodes and also the TKC nodes aren‘t showing up.
I will only see them under workload management.
Any ideas?
vCenter 8.0a
ESXi 8.0 GA
This is weird, can you connect to supervisor cluster using cli? Can you also describe your TKC cluster using kubectl describe command and see your nodes?
Pingback: Deploying vSphere 8 Availability Zones for Tanzu with NSX ALB in No Access Mode - nsxbaas